

- Key Takeaways
- St. Louis Plaster
- Our Repair Services
- The Repair Process
- Historic Restoration
- The Right Materials
- Your Free Estimate
- Conclusion
- Frequently Asked Questions
- What areas of St. Louis do you serve for plaster repair?
- How long does a typical plaster repair take?
- Do you repair both hairline cracks and large damaged sections?
- Can you restore historic plaster in older St. Louis homes?
- What materials do you use for repairs?
- Will you provide a written estimate and timeline?
- How do you prevent future plaster damage?
Key Takeaways
- St. Louis plaster is at special risk from local humidity, seasonal temperature extremes, and aging historic structures. Hire a plaster repair company that understands neighborhood nuances and local building codes.
- Tackle moisture before anything else. Employ moisture meters during inspection, increase ventilation or dehumidification, and specify moisture-resistant mixes and sealants to prevent repeat damage.
- Have a professional evaluate cracks and foundation movement because wide or shifting cracks can indicate structural problems. Use flexible compounds and mesh backing for repairs that tolerate future movement.
- For water damage, move quickly. Remove damaged plaster, dry the area completely, and restore using water-resistant materials. Repair the source of the problem, like roof or plumbing leaks.
- Maintain historic finishes by choosing contractors experienced in matching the unique textures and decorative plaster techniques featured in St. Louis favorites such as Lafayette Square and adhere to local preservation standards.
- Free no-obligation on-site estimate with detailed inspection, test patches, clear cost breakdowns and repair plan for your home or business in Greater St. Louis.
Best Plaster Repair Company St. Louis repairs historic homes and contemporary flats with expert plaster patches and skim coats. Local teams utilize gypsum plaster, lath repair, and moisture control to precisely match texture and paint for Missouri humidity.
Technicians are building code experts and provide free estimates, insurance work, and prompt scheduling in St. Louis city and county. It provides tips for choosing contractors, comparing estimates, and reading local reviews.
St. Louis Plaster
St. Louis plaster encounters unique stresses from climate, building age and local build habits, so repairs demand more than a cookie cutter solution. Hot, humid summers and cold, wet winters force moisture into walls, with most older properties using lime-based plaster and postwar homes using gypsum. Local building codes and neighborhood styles from Lafayette Square to Soulard influence repair decisions.
Hiring the best plaster repair company in St. Louis means a contractor who reads moisture meters, knows lime mixes, follows code and matches textures to original work.
The Humidity
It’s St. Louis humidity that fuels most of the plaster failure in basements, attics, and older bedrooms. Elevated relative humidity promotes mildew, spongy patches, and blistering on lime and gypsum surfaces. Use dehumidifiers in basements and put exhaust fans in kitchens and baths to reduce constant moisture loads.
When inspecting, get moisture meter readings in several locations — behind trim, around windows, and at ceiling junctions — to locate hidden damp areas before you repair. For repairs, select moisture-resistant
with a breathable waterproof sealant where required. That mix avoids repeat failures while allowing lime plaster to dry properly.
Foundation Shifts
Wide cracks and displaced plaster on St. Louis foundation shifts are common, particularly where houses settle down following wet winters or saturated soils. Check for vertical and diagonal cracks around doors and windows following heavy rain or freeze-thaw cycles.
A structural evaluation will inform you if cracks are aesthetic or indicate underlying shifting that demands foundation repair. To repair, reinforce with mesh backing and use flexible compounds so the new surface can flex ever so slightly with the house. This prevents re-cracking and preserves nearby historic moldings.
Water Damage
Typical sources of water damage here are roof leaks, aging plumbing and insufficient attic ventilation. Immediate action saves you from mold and additional plaster breakdown. Cut out compromised plaster to sound lath or studs, dry the cavity with fans or dehumidifiers and then rebuild with lime-based patching for historic walls and gypsum for postwar assemblies.
Annual inspections catch stains, softening and moisture spots early. Scheduling one after severe weather can save you a fortune in content and repair costs. Anticipate regional repair fees somewhere around $20 to $120 per square foot based on scope.
Age and Vibration
Age, settling and traffic vibration produce hairline cracks and flaky patches over time, something typical of those old St. Louis neighborhoods adjacent to the busiest streets. Go with specialty products made for historic work and patch those little cracks fast to preserve the original plaster.
Delicate methods are essential on decorative cornices and medallions. Experienced artisans apply lime mixes in the old fashioned way by hand where necessary. When working, contain dust with plastic and tape, as fine plaster dust is insidious and disperses.
Our Repair Services
We scope out every job with local context in mind, citing St. Louis climate effects, building codes and neighborhood architecture prior to work. We provide a complete line of plaster repairs, whether it’s an older brick flat or a newer suburban build in the greater St. Louis area, matching materials, textures and performance requirements.
- Full crack assessment and structural review
- Walls and ceilings hole and patch repair, small and large.
- Water-damage removal, drying, and plaster or lath replacement
- Skim coating to smooth old textures or update finishes
- Ornamental plaster restoration and replication (molds, cornices, crown)
- Moisture mitigation, waterproof coatings, and ventilation advice
- Historic-material matching using lime-based and modern plasters
- Preventive inspection service after storms or seasonal shifts
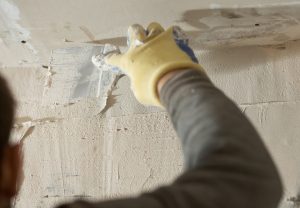
1. Crack Repair
We begin with a calculated diagnosis to uncover subterranean routes and root causes, such as foundation settling or humidity swings typical in St. Louis. Prepare the crack by cleaning, removing loose material, applying mesh reinforcement in necessary spots, and filling with suitable compound, which is lime-based for historical work or modern gypsum for fast set.
Hairline cracks receive flexible fillers and paintable sealants to permit movement, while wider cracks use layers of fill and bonding agents to prevent reopening. Textures are shadowed with feathering compound and custom tools so the fix reads as part of the wall. Routine checkups after hot, humid summers and freezing winters minimize the chance of recurring problems.
2. Hole Patching
Small nail holes get a fast-setting spackle, while bigger holes require backed patches or new lath. We utilize graded sand in base coats and top quality finishing compounds for years of adhesion and surface strength.
Patches are sanded, feathered, and paint sheen matched to hide repairs. We advocate photo documentation of repairs for warranty and quality control records and to see how areas respond over time.
3. Water Damage Restoration
Determine the leak source, demo unsound plaster and wet lath, dry assembly with fans and dehumidifiers, then replace with appropriate materials. Mold prevention is key.
We incorporate antimicrobial primers as needed and suggest roof, gutter, and ventilation upgrades if necessary. In moisture-vulnerable areas, we install water-resistant backers and sealants to reduce reoccurrence.
4. Skim Coating
A skim coat offers a smooth, even surface over textured plaster or patchy drywall. There are several thin passes to guarantee evenness and our professional trowel work eliminates lap marks and bubbling.
Skim coating works wonders when refreshing St. Louis period homes or priming walls for upscale paint.
5. Ornamental Plaster
We repair cornices, medallions, and moldings from molds taken from original or customized casts. We use traditional lime plasters where historic sympathy counts and modern compounds for faster results.
Intricate reproduction needs layer upon layer, carving, and finishing to match age and patina.
The Repair Process
It starts with a plan that puts the repair solution in context and sets directions. A thorough inspection is necessary to discover underlying causes such as moisture penetration, foundation shifts, or previous water leaks. That inspection informs decisions about materials and methods so the repair suits the house and endures.
- Damage assessment and diagnostic inspection.
A technician records cracks, delamination, and soft spots and traces moisture with a meter where necessary. About the repair process in St. Louis, this usually translates into inspecting for basement or roof water chases after a heavy rain and marking down those old lath-and-plaster homes. The idea is to find out what caused the damage so the repair isn’t merely cosmetic.
- Test patches and strategy development.
Test patches help us see how original plaster takes to new mixes and how textures and paints match. The squad experiments with various gypsum or lime mixtures and allows each to cure in order to decide on the best formulation. This stage determines a repair plan for each wall or ceiling, specific to material, age, and finish.
- Preparation and containment.
Plaster dust is fine and travels, so crews tent plastic sheeting, painter’s tape, and airflow before cutting or sanding. Loose plaster is taken down to firm edges. Any underlying wood lath, metal corner bead, or drywall substrate is repaired or reinforced. We shield electrical fixtures and floors.
- Material matching and mixing.
Material matching is key. For our repair process, our technicians choose from gypsum, lime, or compound blends that replicate density and shrinkage characteristics of the original plaster. For historic homes in the St. Louis area, lime-based mixes are frequently used to match old work.
Correct water to powder ratios and mixing techniques impact bonding and finish.
- Skilled application and build-up.
Plaster is applied in layers: scratch coat, brown coat where needed, and a finish coat. Each layer is given time to set before the next. Expert application generates a flat plane and steers clear of ridges or hollows.
Texture blending and color matching take place at this stage, feathering and trowel work blending old and new surfaces.
- Finishing, sanding, and cleanup.
Once cured, final sanding and any paint or skim coat takes place. Crews take down containment, clean fine dust with HEPA vacuums, and inspect the finish under natural light. One to three days are needed for standard patches. Bigger jobs take more time.
- Preventive recommendations and follow-up.
Technicians suggest regular water entry checkups, seasonal inspections, and small touch-ups. Yearly checkups and timely tune-ups minimize return fixes and extend the plaster’s lifespan.
Historic Restoration
Historic restoration in St. Louis begins with understanding what the original builders used and why those materials are important. A lot of the turn-of-the-century houses around here were finished with lime-based plasters that cure and breathe differently than modern gypsum mixes. That means fixing isn’t simply patch and paint.
That means testing, matching material chemistry and using techniques that preserve texture, joint details and decorative profiles to remain faithful to the home’s era.
Here is a simple table of typical historic restoration products and how and when to use them.
| Product / Technique | Use case | Benefit |
|---|---|---|
| Lime putty and lime-based mortars | Repointing and replastering on early 1900s walls | Matches breathability and flexibility of original work |
| Horsehair or hemp reinforcement | Base coat repair on heavy-lath assemblies | Adds tensile strength similar to period mixes |
| Traditional three-coat plaster | Full system replacement on badly damaged bays | Restores original thickness and finish |
| Gypsum-based patching compounds | Small interior cosmetic repairs where original not present | Fast cure, but use sparingly and isolate from lime work |
| Injection consolidants (lime-compatible) | Stabilize powdering or delaminating plaster | Prevents further loss without over‑rigid repairs |
| Custom cast ornament repair | Recreate cornices and medallions | Preserves aesthetic detail and proportions |
Apply these products with techniques that preserve original finishes and textures. Begin by taking samples and recording existing surfaces. Then, mock up repairs on a hidden area to match trowel marks, tool patterns, and color.
If you are applying a new finish coat, apply the same size of aggregate using the same finishing method so the repair blends as one surface. Don’t overcoat with modern moisture trapped impermeable paints on lime plaster.
St. Louis has local preservation guidelines and neighborhood historic districts that likely require some compliance prior to work commencing. Consult with the St. Louis Preservation Board and local landmark commissions to discover permitting processes, acceptable materials, and approved contractors.
Documentation, such as photos, material tests, and repair plans, accelerates approvals and safeguards homeowners during inspections.
Set up a maintenance schedule. Yearly inspections identify hairline cracks, loose cornices, or damp issues in their early stages. Keep an eye on rooflines, flashing, and original wood trim for water penetration.
Deal with small problems immediately before they trigger a big plaster meltdown. For the homeowners out there, hire professionals who know about period materials, lath systems, and how structures interacted.
Historic restoration involves time, artisanship, and thoughtful design to maintain genuineness while transforming the structure into something secure and functional.
The Right Materials
Picking the correct materials is at the heart of any St. Louis plaster repair done right. The city’s older rowhouses, historic brick buildings, and midcentury homes all demand different mixes. Lime-based plaster is a natural fit for historic builds as it breathes and expands with old masonry, while gypsum is ideal for post-war drywall and interior patchwork where quickness and finish is king.
Material science matters here. Knowing porosity, adhesion, and thermal expansion helps predict how old and new layers will bind and age together.
| Material | Typical Use | Key Benefit |
|---|---|---|
| Lime-based plaster | Historic masonry, exterior and interior restoration | Breathability, flexibility, compatible with old substrates |
| Gypsum (plaster of Paris) | Post-war interiors, fast interior repairs | Smooth finish, quick set, easy sanding |
| Portland cement mixes | Exterior repairs on masonry, high-moisture zones | Strong, durable, water-resistant when used correctly |
| Additives (fibers, acrylics, lime putty) | Improve adhesion, reduce cracking | Increased tensile strength, better workability |
| Lime-putty finish coats | Decorative restoration, patina matching | Fine texture, long-term color stability |
Choosing the right materials that work with the original plaster system and new repair is crucial. A lime patch on gypsum will not work because the two systems drain moisture and allow expansion at different rates. The key to a successful repair begins with the test and match of the substrate, then choosing a mix that bonds chemically and mechanically to the existing layers, preventing delamination and future cracking.
By sourcing local materials in St. Louis, the repairs become even more durable and genuine. Local suppliers carry lime putty, local gradings of sand and additives that are appropriate for Missouri’s high humidity, summer heat, and freeze-thaw cycles in the winter.
By using regionally matched sands and lime, it minimizes mismatch in texture and color and helps to avoid moisture traps that result in paint failure and plaster loss. Selecting the appropriate materials will provide the durability, weather resistance, and finish desired.
A repair utilizing the right fiber-reinforced mixes and balanced setting times will withstand the temperature swings and humid summers typical of St. Louis. Using the right materials, master restorers mix old world hand tools and methods with modern additives to mimic texture and color, meld visible joints, and ensure structural bond.
They try little patches, modify mix ratios, and select primers and sealers that enable the wall to breathe yet resist staining. Knowing your material needs, such as type of surface, climate exposure, heritage status, and finish objectives, informs each decision from procurement to application.
This is what distinguishes stop-gap repairs from permanent recovery by the Best Plaster Repair Company St. Louis.
Your Free Estimate
Your Free Estimate We offer free, no-obligation plaster repair and restoration estimates throughout the St. Louis area so that you can make transparent comparisons and plan assuredly. Following a consultation or on-site evaluation, a free estimate details the work, materials, labor and schedule. Most homeowners request estimates to comparison-shop, so we embrace that and try to make the information easy to digest and respond to.
Schedule an inspection by phone or online request, and we’ll set a time that fits your day. A trained technician arrives to examine the affected walls, ceilings, ornamental work, or historic plaster features and documents cracks, delamination, moisture issues, and structural concerns.
The site visit lets us measure areas, note access needs, and confirm whether specialty techniques or historic materials are needed. Within a few days, we deliver a written estimate tailored to the repair needs, showing step-by-step what work will be done and why.
Pricing is clear and broken down. Plaster Repair Average Cost is between $200 and $800. Most plaster repairs are charged within this range, based on the amount of affected area and degree of damage. The written estimate breaks out material cost, labor hours, and any specialty work such as lath repair, ornamental molding restoration, or lime-based historic plaster.
For larger projects or vintage properties requiring matching historic finishes, we detail any extended terms or staged payment options that are applicable. If the job requires scaffolding, multi-room access, or overnight drying, those line items come separately so you can see where every dollar goes.
We promise transparency and client care at every step. Estimates encompass anticipated start and finish dates, daily work windows, cleanup policies, and subcontracted specialty trades. We mention warranty periods and satisfaction promises so you’re aware of the solution if subsequent work is required.
When it comes to plaster restoration in those old St. Louis homes, we prescribe tests for hidden issues such as water intrusion or structural movement and incorporate recommended remedial steps in the estimate.
Examples: A single 8-square-foot ceiling patch might be listed as $275 with material and two labor hours. An elaborate cornice restoration on a ‘20s era home might be $650 with a separate item for molding duplication.
For multi-room restorations, we provide phased estimates and sometimes extended terms to spread cost. Make sure the free estimate you take includes a cost breakdown, timeline, and written warranty so you don’t have surprises.
Conclusion
You receive straightforward choices and local expertise for plaster repair in St. Louis. Our teams here combine old-house care with modern patches. They utilize lime and gypsum mixes to match brick and timber walls. They use a dust limiting, border clean, texture restoring step-by-step repair plan. For historic homes on Lafayette Square or the Central West End, crews repair cornices and medallions with precision and proper molds. We provide free estimates that demonstrate the scope, timeline, and cost of a project prior to any work beginning. Choose a company that posts before and after shots, posts references, and provides a written warranty. Let’s get you a date for your free quote. Contact your local plaster pro today.
Frequently Asked Questions
What areas of St. Louis do you serve for plaster repair?
We cover the whole St. Louis metro area including the city, Clayton, Webster Groves, Kirkwood, Maplewood, and surrounding suburbs. We are fast responders for local historic and modern homes.
How long does a typical plaster repair take?
Most minor repairs are complete in a day or two. Bigger patches or restoration projects may require a couple of days to a couple of weeks, depending on drying and finishing requirements.
Do you repair both hairline cracks and large damaged sections?
Yes. We repair hairline cracks, water damage, and full section replacement. We match texture and finish to seamlessly blend with the surrounding plaster.
Can you restore historic plaster in older St. Louis homes?
Totally. We utilize period-correct methods and materials to maintain original detail on period properties throughout St. Louis. We write up work for conservation reports.
What materials do you use for repairs?
We utilize high-quality lime and gypsum based plasters and compatible lath systems. We select materials for original composition and durability.
Will you provide a written estimate and timeline?
Yes. Of course, a free written estimate with a clear scope, cost breakdown, and timeline before work starts. No strings or hidden charges.
How do you prevent future plaster damage?
We find root causes such as moisture, movement, or bad prior repairing. We repair the source, utilize quality materials, and suggest preventative measures to minimize future occurrences.