

- Key Takeaways
- St. Louis’s Plaster Problem
- Identifying True Craftsmanship
- The Repair Journey
- Beyond Simple Repairs
- The Unseen Details
- Preserving Your Walls
- Conclusion
- Frequently Asked Questions
- What makes a plaster repair company in St. Louis the “best”?
- How quickly can a reputable company repair plaster in St. Louis homes?
- Do plaster repairs require special permits or historic approvals in St. Louis?
- Will repaired plaster match my existing wall texture and paint?
- How much should I expect to pay for plaster repair in St. Louis?
- Can I prevent future plaster damage in St. Louis’s climate?
- Do contractors offer warranties or guarantees on plaster work?
Key Takeaways
- St. Louis humidity and clay soils speed plaster destruction. Manage interior moisture with de-humidifiers and test moisture levels with moisture meters to avoid swelling, mold, and paint failure.
- Foundation movement from shifting clay causes wide cracks and displaced lath. Check basements and ground-level walls frequently and employ mesh reinforcement or professional stabilization when movement is found.
- Historic homes require period-appropriate materials and techniques. Be sure to hire a company experienced in lime plaster, ornamental restoration and local preservation board requirements to safeguard character and value.
- Expert fixing comes after a moisture testing diagnostic, with custom material choices and delicate application. This requires detailed estimates, technical repair plans, and a written schedule.
- Best plaster repair company st. louis where quality craftsmanship shows in seamless texture matching, clean trowel work, and strict site professionalism. Check contractors’ portfolios, request references, and confirm dust control and protection.
- Maintain Plaster with Root Cause Repair — Maintain plaster by repairing root causes like leaks and foundation issues, scheduling routine inspections, and using gentle living to reduce vibration and extend repair lifespan.
Best Plaster Repair Company St. Louis is a local company specializing in repairing both interior and exterior plaster on historic homes as well as contemporary structures.
With licensed crews and local building code knowledge, it provides patching, lath repair, cornice restoration, and textured finishes. Rates and timelines are displayed in advance and materials are tailored to Missouri climate requirements.
Homeowners and small contractors in St. Louis rely on transparent quotes, on-site evaluations, and guaranteed service.
St. Louis’s Plaster Problem
St. Louis homes have their own set of recurring plaster problems related to climate, soils, the age of the building and daily wear and tear. Here we break down the primary mechanisms behind plaster failure in the area, describe how to identify and quantify damage, and lay out actionable repair and preservation measures every homeowner should anticipate when engaging the Best Plaster Repair Company St. Louis.
The River City Humidity
St. Louis’s muggy summers cause plaster to crumble and crack, opening the door for mold and mildew. Plaster soaks up moisture, expands like a sponge, then flakes away when it dries unevenly. Dehumidifiers and whole house moisture control eliminate the repeated wet-dry cycles that weaken gypsum and lime plasters.
Moisture meter readings guide targeted fixes. Surface readings spot damp paint, and deeper probes locate trapped moisture behind lath or in cornices. Inspectors monitor for paint failure, brown staining, soft spots, and a musty odor. Those are the early signs of humidity-related plaster damage and potential mold colonization.
Our Shifting Clay Soil
The city’s soil and freeze-thaw cycles can shift foundations, resulting in wide cracks and gaps and displaced lath systems that allow plaster to drop away. Inspect basements and ground-level walls regularly to catch movement early. Look for step cracks, crooked door jambs, and separation at window sills.
Reinforcement means mesh backing, mechanical ties to framing, and multi-pass patching methods that bridge moving joints. Foundation-plaster repairs go neglected, leading to progressive failure and structural instability that increase repair costs and risks.
The Weight of History
A lot of the old St. Louis homes were constructed with lime-based plasters and original ornamental work that require special attention. Restoring historic features and moldings requires period materials, lime plaster mixes and traditional trowel work to replicate texture and breathability.
If you’re going to do it, at least do it according to local preservation guidelines and the St. Louis preservation board’s requirements for altering historic fabric. Gypsum or cement overlays will trap moisture and kill your house.
Professional plaster restoration maintains neighborhood charm and property value and helps eliminate recurring moisture issues in old walls.
Modern Life Vibrations
Building, rush-hour, and refrigerators generate itsty-bitsy, teeny-weeny, tiny-sniny vibrations that slowly give you hairline cracks and fine plaster dust. Flexible paintable sealants and specialty joint compounds can handle minor movement without re-cracking.
Regular inspections in bedrooms, living rooms, and flats uncover fresh or returning cracks before they expand. Everyday wear — hauling furniture, playing children, leaking roofs, burst pipes, or inadequately sealed windows — creates holes and water intrusion that need to be repaired quickly and correctly.
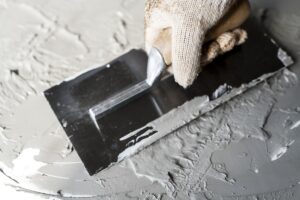
Identifying True Craftsmanship
True craftsmanship shows up in small things: crisp inside corners, level runs, tight joins and surfaces that read as original work. Here in St. Louis, where rowhouses, brick fronts and historic mansions mingle with modern builds, the Best Plaster Repair Company St. Louis replicates those little hints and looks past the surface damage and toward the deeper causes.
1. Diagnostic Approach
A methodical restoration begins with a thorough examination and documentation of fractures, separations, and impacted zones. Photos, notes, and sketches record wall, ceiling, and basement issues so the strategy is obvious. Moisture meters and basic material tests identify unsound plaster and active moisture.
A visual inspection identifies hairline cracks and stress patterns that suggest structural shifting. From these findings, the crew composes a specific repair plan detailing techniques, materials, and scheduling for each surface. Professional plaster wall repair companies include free moisture meter readings to demonstrate to homeowners precise conditions prior to work commencement.
2. Material Mastery
Knowing about real craft distinguishes a temporary fix from a permanent solution. Lime putty, modern gypsum mixes, and the right joint compounds all play their roles depending on substrate and age. Additives, graded sand, and mesh reinforcement provide tensile strength to repairs, holding future cracks at bay.
Different gypsum and lime blends suit specific jobs: lime-rich mixes bond better on old lath and historic masonry, while gypsum-based compounds speed interior patch work. A straightforward table assists in matching decisions to the needs of the building by comparing price, longevity, and compatibility.
3. Historic Integrity
Restoration takes period-appropriate techniques. Utilize lime patch and lime plaster and match base coats when possible in an effort to retain the original builder’s intent. If a match texture and finish coat is used, repairs can be invisible and preserve the historical value.
Local landmark commissions in St. Louis laid down guidelines. Adherence to such regulations and city codes is required for stamped work and for tax-credit eligibility on certain projects.
4. Seamless Integration
Mixing new plaster into old is all about surface prep, feathering and fine trowel work. Color consultation and texture matching make entire rooms read as one. Specialty tools reinvent fine tool marks from the original finish.
All finished patches are paint-ready and suitable for any future wallpaper, trim or coatings.
5. Site Professionalism
Containment of plaster dust and cleanup are serious issues for homes and apartments. Shield flooring and furniture with commercial covers. Teams have to demonstrate transparent communication, timely delivery, and code-compliant safety measures.
Respectful on-site conduct and written warranties complete the portrait.
The Repair Journey
The repair journey maps out a route from initial inspection to final walk-through, illustrating what a homeowner can anticipate when they hire the Best Plaster Repair Company St Louis. Here’s my numbered, step-by-step practical sequence, materials, and checks for typical plaster projects in the St. Louis region.
1. Inspection and Assessment
A complete inspection logs new damage and old characteristics, tests for hairline cracks, water-worn soft spots, and records areas of loose material. Photos and notes provide the foundation for a precise estimate and repair plan.
Talk about homeowner expectations, budget, and timeline at this point. The job typically runs 1 to 3 days, depending on size. Check insurance and any special requests for decorative work or period finishes.
2. Preparation Plan
Strip unsound plaster and clean back to solid lath. Test with moisture meters and drying equipment to verify stable substrate.
Cover floors, trim, and furniture with plastic wrapping and painter’s tape to contain any fine plaster dust. Source from local St. Louis suppliers so composition and texture match original walls and local building codes.
3. Material Match and Specialty Work
Choose the perfect lime or gypsum blends and specialty additives for wet lath, big patches, or historic ornamental profiles. Use appropriate products for the task to minimize future cracking from settling or temperature swings.
Maintain a materials and batch mixes log for homeowner transparency.
4. Skilled Application
Apply in layers with proper cure times between coats, using skilled trowel work to prevent subsequent loss. Texture blending and color matching prior to finish coat.
Additives can be used where needed to bond poorly keyed surfaces and make sure things stay put.
5. Final Finish and Walk-through
Sanding and texture matching and finish coat are last, with drying times accounted for before paint or wallpaper. Test surface strength and porosity, and show the repair to the homeowner at a post-repair walk-through.
Give it some TLC with maintenance tips: control humidity, repair leaks immediately, and don’t hang heavy decorations on old walls.
Initial Consultation
A comprehensive exam documents injury and history and directs the quote. Capture cracks and loose plaster with photos to add clarification to scope.
Go over budget, timeline, and what the homeowner is expecting, along with any insurance or specialty finishes.
Meticulous Preparation
Some prep work consists of taking out any bad plaster, drying with fans or dehumidifiers, and checking moisture levels. This is to safeguard surrounding surfaces against fine dust with sealed plastic and tape.
Sourcing local materials helps match original texture and keeps the work code-compliant.
The Art of Application
- Improper mix ratios lead to shrinkage; follow manufacturer specs.
- Painting on too thick coats leads to extended dry times and cracking.
- Skipping bonding agents on poor surfaces results in delamination.
- Rushing cure time invites future failure.
Expert trowel work and proper mixes keep it from cracking later. Apply specialty products to wet lath or large patches as necessary.
Always enumerate typical application mistakes and how to avoid them for quality control.
Final Finishing
Sand carefully, texture match, and let dry completely before painting. Examine porosity and surface strength in a final inspection.
Give homeowners maintenance advice to prolong repair life.
Beyond Simple Repairs
St. Louis plaster work that’s more than skin deep. The climate here, hot, muggy summers and dank winters, makes moisture a permanent menace to plaster. Older homes frequently display wear from foundation shifts, humidity swings or hidden drips. More than just cosmetic fixes, our comprehensive approach blends repair, diagnosis and value added services so the work endures and the finish complements the home’s original character.
Skim Coating
Skim coating smooths out rough, uneven, or damaged plaster to provide a new, paint-ready surface. A thin skim coat of gypsum or lime-based mix is floated over the wall to plug hairline cracks and small hollows, resulting in a flat plane perfect for contemporary paints or breathable finishes. Contemporary gypsum mixes cure reliably and sand effortlessly, while lime mixtures provide elasticity and vapor permeability ideal for old walls.
Surface prep is key. Old paint, loose plaster, and trapped moisture need to be removed or stabilized first. The substrate must be allowed to dry to recommended moisture readings, which are often verified with a moisture meter. They bond to clean edges and keyed repairs, and sometimes a bonding agent is required for proper bonding. Otherwise, the skim coat can delaminate.
Skim coating is a great cosmetic fix for everything from postwar vinyl-sided boxes, suburban brick builds, and modern St. Louis flats. It is an important step prior to decorative work or new paint.
Ornamental Restoration
Ornamental restoration requires expert talent and time. Cornices, rosettes, and historic moldings should be paired with period materials and hand-applied methods so that the end product matches the original work. Craftspeople utilize custom molds, lime-based plasters, and hand carving to authentically replicate profiles.
We comply with local preservation guidelines and neighborhood standards, especially in historic districts such as Lafayette Square or Soulard. Original detail, molds in half-measure, and photo documentation direct reproduction and can assist in obtaining approvals as necessary.
Master craftsmen can detect lurking issues beneath decorative finishes, like moisture behind cornices or early foundation shifts. They design custom molding masterpieces that accentuate a room’s most flattering attributes.
Water Damage Remediation
Water-damaged plaster repair begins with a clear inspection and root-cause fix. Stop roof leaks, address poor drainage, or repair basement moisture sources before patching. This goes beyond just ripping out busted plaster. Controlled drying with fans and dehumidifiers, mold treatment if and where needed, and repeat moisture meter checks are essential.
Once dry, apply mesh reinforcement, compatible repair compounds and sealants selected for breathability when necessary. Whatever you do, don’t use incompatible materials; it’s a recipe for trapped moisture and repeat failures. Due to hidden damage from shifting soil or previous leaks in many older St. Louis homes, inspections have to be exhaustive.
Repairs must be selected to provide long-term fixes over a quick patch. These are often value-added services like color consultation, painting, mold remediation, or full cosmetic matching to make the finished surface look ‘original’ and perform for years.
The Unseen Details
Plaster repair in St. Louis is usually more than an aesthetic quick fix. The muggy Midwest air, older brick and stone inventories and antique interiors all conspire to mask issues under completed layers. Precise bids, explicit timelines and documented scope help keep projects on schedule and shield homeowners from price creep and delays.
Transparent Estimates
Itemized, obligation-free estimates are essential when selecting the Best Plaster Repair Company St. Louis. A good estimate itemizes labor hours, discrete line items for gypsum, lime or specialty products, and pattern or texture match fees.
Compare a minimum of three local bids to identify any large discrepancies. Smaller firms may offer a lower price but leave out crucial steps such as substrate prep or lath replacement. Request layman descriptions of any strange charges like containment, scaffold rental, or humidity-control drying equipment.
Create a checklist for estimates: surface prep, removal of failed plaster, lath condition, base coats, finish coats, matching texture, primer and paint, disposal, permit costs, and warranty terms.
Project Timelines
Typical timelines vary. Small nail-hole and hairline crack repairs may be done in a day. Full ceiling repairs or replastering a room commonly take several days to weeks because of multi-coat drying and curing cycles.
Drying time varies by product. Lime plasters and old school mixes cure at different rates than gypsum-based compounds. The St. Louis humidity can seriously drag out curing time, meaning longer windows during the summer.
Manage expectations by scheduling based on repair complexity and local weather forecasts. Account for material backorders or hidden repairs uncovered following demo. Provide homeowners with a written schedule that includes milestones: demo, substrate repair, coat applications, texture match, sanding, priming, and final inspection. Give regular progress updates.
Handling Surprises
Hidden damage appears frequently: wet lath from roof leaks, mold behind plaster, or compromised framing. Be sure to immediately notify any scope, cost, or timeline change as these issues emerge.
Have contingency plans: access to a mold remediation specialist, spare materials like matching lime putty, and agreements for structural trades if framing must be repaired. Record shocks with pictures, notes, and updated quotes for insurance and future servicing.
Experienced tradesmen weigh tradition, hand-applied lime or horsehair mixes, against contemporary materials, maintaining historic patina wherever possible while prioritizing longevity and energy efficiency. Closing holes minimizes drafts and may even reduce energy costs.
Preserving Your Walls
Maintaining your plaster walls in St. Louis begins with knowing local climate stresses and everyday maintenance. Humidity from wet summers and winters accelerates plaster deterioration, so mitigation and preventive treatment keep repairs minimal and cheaper. Here are some targeted tips for homeowners to maintain historic and modern plaster finishes and to collaborate with the Best Plaster Repair Company St. Louis when deeper work is required.
Climate Control
|
Solution |
Benefits |
Notes for St. Louis |
|---|---|---|
|
Dehumidifier (whole-house or portable) |
Lowers relative humidity, reduces mold risk |
Run in summer; aim for 35–50% RH |
|
Window and door seals |
Stops drafts, limits moisture entry |
Replace worn weatherstripping seasonally |
|
Roof and gutter maintenance |
Diverts water away from walls and foundation |
Clean gutters after heavy leaf fall |
|
Basement waterproofing |
Prevents rising damp and salt migration |
Use sump pumps where needed |
|
Smart hygrometer |
Continuous humidity tracking |
Alerts after storms or heat waves |
Seal windows, roofs and basements to keep out moisture and reduce mold danger. Keep an eye on interior humidity with a hygrometer and schedule servicing of dehumidifiers, HVAC filters and guttering to avoid moisture cycles that damage plaster.
Periodic touch-ups of paint and caulking reduce moisture ingress.
Foundation Awareness
Be on the lookout for wide vertical cracks, displaced plaster, or stair-step breaks in masonry. Those are indicators of foundation movement that occurs frequently following the heavy rains or flooding that our St. Louis region experiences.
Plan on having foundation professionals check it out after major storms, obvious settling, or doors and windows that start to stick.
Preserving Your Walls: Reinforce susceptible plastered sections with mesh backing and the proper lath when repairing, particularly in older residences such as Victorians or Tudor bungalows where the originals still count.
Tackle foundation problems right away. Fixing underpinning or drainage now saves you from expensive plaster jobs down the line and less structural danger.
Gentle Living
Minimize vibration and dull blows that cause plaster to shake loose. Install soft-close hinges, don’t slam doors and place felt pads on furniture and appliances next to plastered walls.
Don’t hang heavy art or mirrors on thin or old plaster without a proper back. Wash carefully, using a soft cloth and mild detergent and avoiding solvents that remove lime or gypsum binders.
Train family members to treat plaster surfaces with care. This reduces repairs and aids in maintaining original finishes and textures employed in Italianate and Arts and Crafts homes.
Document each repair and restoration project, saving receipts and photos and noting techniques used. These records will increase resale value and assist future conservation efforts.
Conclusion
St. Louis homes require consistent, professional plaster attention. Local crews with proven mixes, tight taping, and meticulous sanding provide your walls extended longevity. Seek out companies that provide before-and-after photos, transparent quotes, and detail how they coordinate new plaster with existing paint and trim. Very nice crews work clean, remain on schedule, and respect old moldings. A good repair preserves character, increases value, and reduces future labor. For instance, a midtown brownstone received complete ceiling replastering and retained its crown molding. The owner sold more quickly and at a better price. Choose a company with local references, written guarantees, and clear timelines. Want to compare St. Louis pros? Obtain three estimates and schedule a start date.
Frequently Asked Questions
What makes a plaster repair company in St. Louis the “best”?
The best companies mix local expertise, licensed artisans, excellent feedback, and written guarantees. They understand St. Louis homes, the effects of humidity, and historic plaster methods.
How quickly can a reputable company repair plaster in St. Louis homes?
Small cracks and nail pops can usually take a few hours to a day. Bigger restorations or historic work may take several days to weeks, depending on drying times and intricacy.
Do plaster repairs require special permits or historic approvals in St. Louis?
Typically no for interior repairs. Local historic district homes might require permission for visible modifications. Always confirm with the St. Louis Preservation Board for landmark properties.
Will repaired plaster match my existing wall texture and paint?
Experienced artisans can closely match texture and paint. Request pictures of previous matches and a paint color-matching service for an almost invisible repair.
How much should I expect to pay for plaster repair in St. Louis?
Small repairs generally cost between $100 and $500. Large or historic restorations may be more expensive. Obtain written estimates that include the scope, materials, and timeline.
Can I prevent future plaster damage in St. Louis’s climate?
Yes. Manage indoor moisture, repair roof and plumbing leaks immediately, and keep an eye on foundation settling. Standard upkeep reduces the danger of new cracks and delamination.
Do contractors offer warranties or guarantees on plaster work?
Good companies will give you written warranties for workmanship and materials, typically one to five years. Inquire about warranty provisions and what would void coverage.