

Looking to restore your walls to their former glory? Dealing with cracks and imperfections in your plaster surfaces? Say goodbye to unsightly blemishes with our expert plaster repair solutions. Our team specializes in rejuvenating your walls, leaving them smooth and flawless with wet plaster, old plaster, finish coat, and loose plaster. Whether it’s a small patch or a complete overhaul of areas, coat plaster, or finish coat, we’ve got you covered. With our meticulous attention to detail and years of experience, we guarantee top-notch results that will exceed your expectations. Don’t let damaged plaster, crack, drag down the aesthetics of your space any longer. Trust us to revitalize your walls and transform your interior into a pristine masterpiece.
Key Takeaways
-
Prepare Properly: Before starting plaster repair, ensure you have the necessary tools and materials ready to streamline the process.
-
Address Cracks Promptly: Fixing cracks in walls early can prevent further damage and maintain the integrity of the plaster.
-
Mind the Holes: When repairing holes in walls, use the right techniques to ensure a seamless and durable finish.
-
Lath Matters: Understanding lath and plaster repair techniques can help you tackle more extensive damage, such as cracks, effectively.
-
Smooth for Success: Pay attention to smoothing and finishing details to achieve a professional-looking result that blends seamlessly with the existing wall.
-
Regular Maintenance: Implementing maintenance tips can prolong the life of your repaired plaster and prevent future issues.
Understanding Plaster Repair
Types of Damage
Identifying various types of plaster damage is crucial for effective repairs. These include hairline cracks, larger cracks, holes, and bulging areas. Each type of damage has distinct causes that must be addressed during the repair process. Understanding the severity of the damage is essential to choose the right repair techniques.
Tools and Materials
To tackle plaster repair effectively, gather essential tools like a cold chisel and ball peen hammer for removing damaged plaster. Safety goggles are crucial to protect your eyes during repairs. Ensure you have a latex bonding agent to improve adhesion between layers of plaster. When it comes to materials, plastic drop cloths and painter’s tape are vital for protecting surrounding surfaces from damage. Spackle and self-adhesive fiberglass wallboard tape are necessary for filling cracks and holes in the plaster. A sanding respirator is essential for safety when sanding down repaired areas.
Use specific tools such as a cold chisel and ball peen hammer for removing damaged plaster efficiently. Safety goggles are crucial to protect your eyes during repairs, especially when chiseling or hammering. Ensure you have a latex bonding agent to enhance adhesion between layers of plaster for a durable repair. Plastic drop cloths and painter’s tape are essential for protecting floors, walls, and furniture from dust and debris during repairs. Spackle is perfect for filling small cracks or holes in the damaged area before applying joint compound or plaster mix.
Preparing for Repair
Room Prep Steps
Preparing the room is crucial before repairs to ensure a smooth process and excellent results. Begin by covering the floor with plastic drop cloths, securing them with painter’s tape to avoid messes. Seal off the room using plastic sheeting and remember to cover vents to contain dust during the repair.
Maintain the room temperature between 55-70 degrees Fahrenheit for optimal plastering conditions. This range ensures proper drying and adhesion of the plaster, leading to a successful repair job.
Safety Tips
Safety should be a top priority when undertaking repairs. Equip yourself with safety goggles, a long-sleeved shirt, cotton work gloves, and a sanding respirator before starting the repair process. These protective measures safeguard your eyes, skin, and respiratory system from potential hazards that may arise during plaster repair.
Follow safety guidelines meticulously to prevent accidents and maintain a safe working environment throughout the repair project. Prioritizing safety not only protects you but also ensures a smooth and secure repair process.
Fixing Cracks in Walls
Identifying Cracks
Inspect your walls thoroughly to spot any visible cracks, whether they are small or large, to assess the damage. Differentiate between hairline cracks, which are tiny and superficial, and larger cracks that indicate more significant structural issues. Be sure to pay close attention to cracks near corners, windows, and doors as these areas are commonly affected by plaster damage.
Repair Process
Smooth out damaged areas by eliminating loose plaster, then apply a layer of fresh plaster over the affected area, allowing it to dry completely. For small cracks, use spackle to fill them in effectively. In contrast, for larger cracks, opt for joint compound as it provides better coverage and adhesion. Follow a step-by-step repair process meticulously to ensure a seamless finish and restore the integrity of the plaster surface.
Repairing Holes in Walls
Removing Damaged Plaster
To start patching up holes in walls, safely remove damaged plaster using a cold chisel and a ball peen hammer. Clear loose debris to prepare for repair. Apply a latex bonding agent to the exposed lath and plaster for improved adhesion before proceeding further.
Bonding and Layering
For a durable repair, apply multiple layers of plaster to ensure a strong bond. Cross-scratch the first layer before adding the second for better adhesion. To achieve a seamless finish, use joint compound as the final step in the repair process.
Lath and Plaster Repair
Metal Lath Insertion
Insert metal lath into larger holes to reinforce the damaged area for enhanced stability. Secure the metal lath firmly before plaster application to ensure a durable and long-lasting repair. Follow specific guidelines for effective metal lath insertion to strengthen the damaged wall effectively.
Plaster Application
Mix dry plaster with water until you achieve a smooth, workable consistency suitable for application. Apply the plaster evenly over the damaged area using a putty knife for precise results. Ensure that the plaster dries completely before proceeding with additional layers or finishing touches.
Smoothing and Finishing
Sanding Techniques
Proper sanding techniques are crucial for achieving a seamless finish on the repaired plaster surface. Gently sand the dried plaster to avoid any damage or new imperfections. Thorough sanding is essential to ensure a uniform texture across the entire surface.
-
Use gentle pressure while sanding to prevent any mishaps.
-
Start with a coarse-grit sandpaper and gradually move to finer grits for a smooth finish.
-
Regularly inspect the sanded area to ensure evenness before proceeding to the next step.
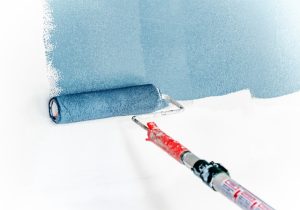
Priming and Painting
Before painting, it’s essential to prime the repaired plaster surface for improved adhesion and durability. Opt for a high-quality primer specifically designed for plaster surfaces. Select paint colors that complement the existing decor to seamlessly blend the repaired area with its surroundings.
-
Apply the primer evenly using a brush or roller for complete coverage.
-
Allow the primer to dry completely as per the manufacturer’s instructions before painting.
-
Choose paint finishes like satin or eggshell for a smooth appearance on plaster surfaces.
-
Apply multiple thin coats of paint rather than a single thick coat for better results.
Project Shopping Lists
For Cracks
Address cracks promptly to prevent further damage by using spackle for minor ones and joint compound for larger cracks. Reinforce repairs with self-adhesive fiberglass wallboard tape.
-
Pros:
-
Spackle is easy to apply and dries quickly.
-
Joint compound provides durable repairs for significant cracks.
-
-
Cons:
-
Repairing larger cracks may require multiple applications of joint compound.
-
Fiberglass wallboard tape may be visible under thin layers of paint.
-
For Holes
Repair holes in plaster by filling them with plaster, applying multiple layers, and finishing with joint compound for a seamless look. Enhance adhesion with a latex bonding agent.
-
Steps for hole repair:
-
Fill the hole with plaster.
-
Apply multiple layers, allowing each to dry completely.
-
Finish with joint compound for a smooth surface.
-
-
Key Information:
-
Latex bonding agents improve the bond between old and new plaster.
-
Cross-scratching the plaster before applying the bonding agent enhances adhesion.
-
For Lath Repair
Strengthen damaged lath by using a latex bonding agent before applying plaster. Add metal lath for extra support in extensively damaged areas.
-
Specific steps for lath repair:
-
Apply latex bonding agent to damaged lath.
-
Add plaster over the bonded area.
-
Insert metal lath where needed for reinforcement.
-
-
Examples:
-
Metal laths are commonly used in older homes with traditional plaster walls.
-
Properly repaired laths can extend the lifespan of the wall significantly.
-
Maintenance Tips
Regular Checks
-
Conduct routine inspections of plaster walls to catch new damage early.
-
Look for cracks, holes, or bulges in repaired areas during checks.
-
Schedule regular assessments to maintain plaster integrity and address issues promptly.
Preventive Measures
-
Maintain optimal room temperature to prevent plaster issues.
-
Address minor damages quickly to avoid major repair projects later on.
-
Be proactive in spotting and fixing potential problems to extend wall lifespan.
Summary
Now that you have a comprehensive understanding of plaster repair, from preparing the walls to finishing touches and maintenance tips, you are well-equipped to tackle any plaster issues in your home. By following the steps outlined in this guide, you can confidently fix cracks, holes, and lath and plaster damage efficiently and effectively. Remember to keep your project shopping list handy to ensure you have all the necessary materials before starting any repair work.
Take action today and apply what you’ve learned to restore your walls to their former glory. With the right tools and techniques, you can achieve professional-looking results while saving time and money on repairs. Don’t let plaster issues linger – address them promptly using the knowledge and skills you’ve gained from this guide. Your home will thank you for it!
Frequently Asked Questions
### How can I identify if my walls need plaster repair?
Inspect your walls for cracks, holes, or uneven surfaces. Tap the wall – hollow sounds indicate potential issues. Look for peeling paint or bulging areas. These signs suggest the need for plaster repair.
What tools do I need to prepare for a plastering repair project?
Gather essential tools like a putty knife, sandpaper, joint compound, paintbrushes, and a drywall saw. Have materials such as plaster mix, mesh tape, and primer ready for efficient repair work.
How do I fix cracks in my walls using plaster repair techniques?
Clean the crack area, apply mesh tape over it, and spread joint compound with a putty knife. Smooth the surface and let it dry before sanding. Finish by priming and painting over the repaired crack.
Can I repair large holes in walls with plaster?
Yes, you can fix large holes by cutting out damaged sections to create a clean edge. Attach wooden backing behind the hole and fill it with layers of joint compound or plaster mix. Sand and finish as needed.
What are some maintenance tips to prevent future plaster damage, especially on gypsum finish coat wall surfaces?
Ensure proper ventilation to prevent moisture buildup that can damage plaster. Regularly inspect walls for any signs of damage and address them promptly to avoid extensive repairs later on. Keep humidity levels stable to preserve your walls‘ integrity.